Good morning everyone! I'm about as amazed as you are that I'm posting twice in one week..but we have Spring break right now so I'm on a more relaxed schedule. And the stamping bug has hit me hard this week. So today I'm very inspired to share TWO things with you. A card and a product review. But let's get the important thing done first.
My daughter Claudia will turn 11 next week. On Good Friday...much to her dismay (since that means no party and celebrations until the following week). I come from a Polish background and growing up we were so strict we weren't even allowed to watch TV, listen to the radio, or even use scissors from Holy Thursday night through Easter morning! Anyway, this child of mine is a DIVA through and through so I was happy to have this UPTOWN girls stamp in my stash. The background is a lovely glitter paper from American crafts...You can't tell from the card but it is SUPER sparkly! her shoes are stickled in gold. This is most appropriate since since she is getting gold sandals similar to this style(the heel not so high...LOL). Inside, the sentiment says "Wishing you a birthday that is just your style" which comes with the stamp. By the way, her dress is covered in stickles so it is also super sparkly, just like this child!
 |
| Stamps: Stamping Bella (Uptown Girl Posh), sentiment from Stampin Up. Die cuts: Nestablities. Leaf Punch: McGill (old). Flowers: Flowers are from Michael's Recollection line. Paper: (blue) POW! Glitter paper from American Crafts; Flower paper is Crate Paper Farmhouse Collection; orange strip is Basic Grey. Stickles used on dress and gifts. | | |
|
|
|
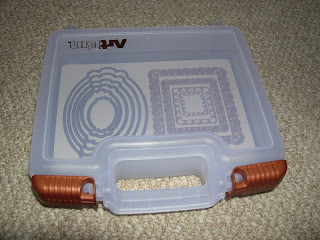
Now, onto the product review. Have you ever wondered how to store your Nestabilities? I should probably do this with all my dies, but Nesties are so large. So I have 3 systems, which I will show below, but I think I will convert to System 1...the newest system called the Art Bin which I purchased from
Archivers, but also saw that
7 Kids College Fund sells them too (currently on preorder). I just love this new little case! See below for explanations.
 |
| System 1. The Art Bin. Has magnetic pads within 1 bin. The pros are you can store everything in one place and it saves room. You can purchase 3 magnetic sheets in one package. In the photo, there are 6 magnetic sheets in the bin with plenty of room left to add more. The downside is that you have to flip through all the sheets to get what you want but it really isn't too much of a burden. I love the compactness of it all |
 |
| System 2. I purchased these wooden things in Michael's and painted them. Then I added a magnetic strip. LOVE the fact that it's all there in front of you so you can see it all, but it's very space consuming (and time consuming to make them). You can hang these on the wall or stack them. |
 |
| System 3. The oldest system. These are old CD cases to which I added magnetic strips. I don't really like this system at all because I feel like I'm constantly flipping through all the cases and it's hard to compare the sizes (the basics come in a larger and smaller version). The other downside is that most newer nesties won't fit in the cases. |
Hope you enjoyed today's post. Thank you for stopping by and see you soon (sooner than you think!) Margaret


Looking forward to checking out your nestie storage in person. I use your #3 and am quite happy with it. The only thing I can think of that I would like better would be a wall of magnet to hang them on, but I have no wall space. Claudia will love the card!
ReplyDeleteOh wow! Your card is gorgeous! I love the colors used!!!
ReplyDeleteThank you so much! :)
ReplyDelete